Showing posts with label Craftwork Cards. Show all posts

Monday, 24 July 2017

Silver anniversary card

Hello,
this is the 25th anniversary card I made for a friend.

I used an 8 x 8 silver card blank on to which I matted and layered black card and then a silver embossed patterned card. I used an image from the Hunkydory Anniversaries Little Book matted on to black card.

To finish it off I die cut my friends' initials using the Tonic Clarice die set and a heart using a Crafter's Companion from silver mirri card, and added some Craftwork Cards silver card candi and a silver and white organza ribbon bow.

Thanks for stopping by, if you've time to leave a comment I'd really appreciate it.

Monday, 3 July 2017

I don't do mornings!

Hello,
this is a card made for one of my close friends and we always joke she really doesn't do mornings! As soon as I saw the image I thought of her.

The image is from a pad of funny pictures which I bought and split with a friend so I'm not sure where it came from, but might have been Docrafts. The co-ordinating patterned backing paper is from the same pad. I covered an A5 card blank with lilac card, then matted purple card and the backing paper on to the card front. I matted the image on to the same purple card and fixed it to the card front at a jaunty angle using foam pads.

The sentiment is cut from the lilac and the purple card using a Tonic Miniature Moments die then drop shadowed one on top of the other, fixed to the card front. I finished the card off by adding some purple card candi from Craftwork Cards.

Thanks for stopping by, if you've time to leave a comment it will be very much appreciated.

I'm entering this for the following challenge:
Craftyhazelnut's Patterned Paper Challenge July 2017


Saturday, 1 July 2017

Ladybug fairy

Hello,
this is my DT card for the Fairy and Unicorn Challenge blog for July. This month we're sponsored by Bugaboo Stamps and I've made the card using their Ladybug stamp.

I started with an 8 x 8 white card blank. In a recent issue of Quick Cards made easy the free gift was some Fairy Dust papers and stamps which I've used. I cut 2 panels of black card to cover each side of the card front, matted the pink fairy paper on to them, and then the panels to the card front.

I printed the Ladybug digistamp and coloured it using a mix of Promarkers (Gold, Tulip, Cardinal Red, Meadow Green) and Spectrum Noirs (TB1, TB2, TB3) then added sparkle to the wings using a Spectrum Noir Sparkle pen. Using the Tonic Deco Layering die set I die cut the image, a blue mat from a Hobbycraft Ombre Array pad and another mat from black card. These were layered up and fixed to the card front using foam pads.

I stamped a sentiment from the free gift and cut that and a black mat from the same Tonic die set. I fixed this to a blue band the same width as one of the panels and fixed the whole thing to the card front using glue. I finished the card off by adding some Craftwork Cards card candi in two shades of pink to match the pink backing paper.

I hope you like the card, any comments are much appreciated and please join us this month at the Fairy and Unicorn Challenge.

I'm also entering this into the following challenges:
Bugaboo Crafty Challenge No 6
Classic Design Team Open Challenge Blog No 16 July 2017
Craftyhazelnut's Patterned Paper Challenge July 2017
Love to Craft Challenge Blog July 2017


Friday, 28 April 2017

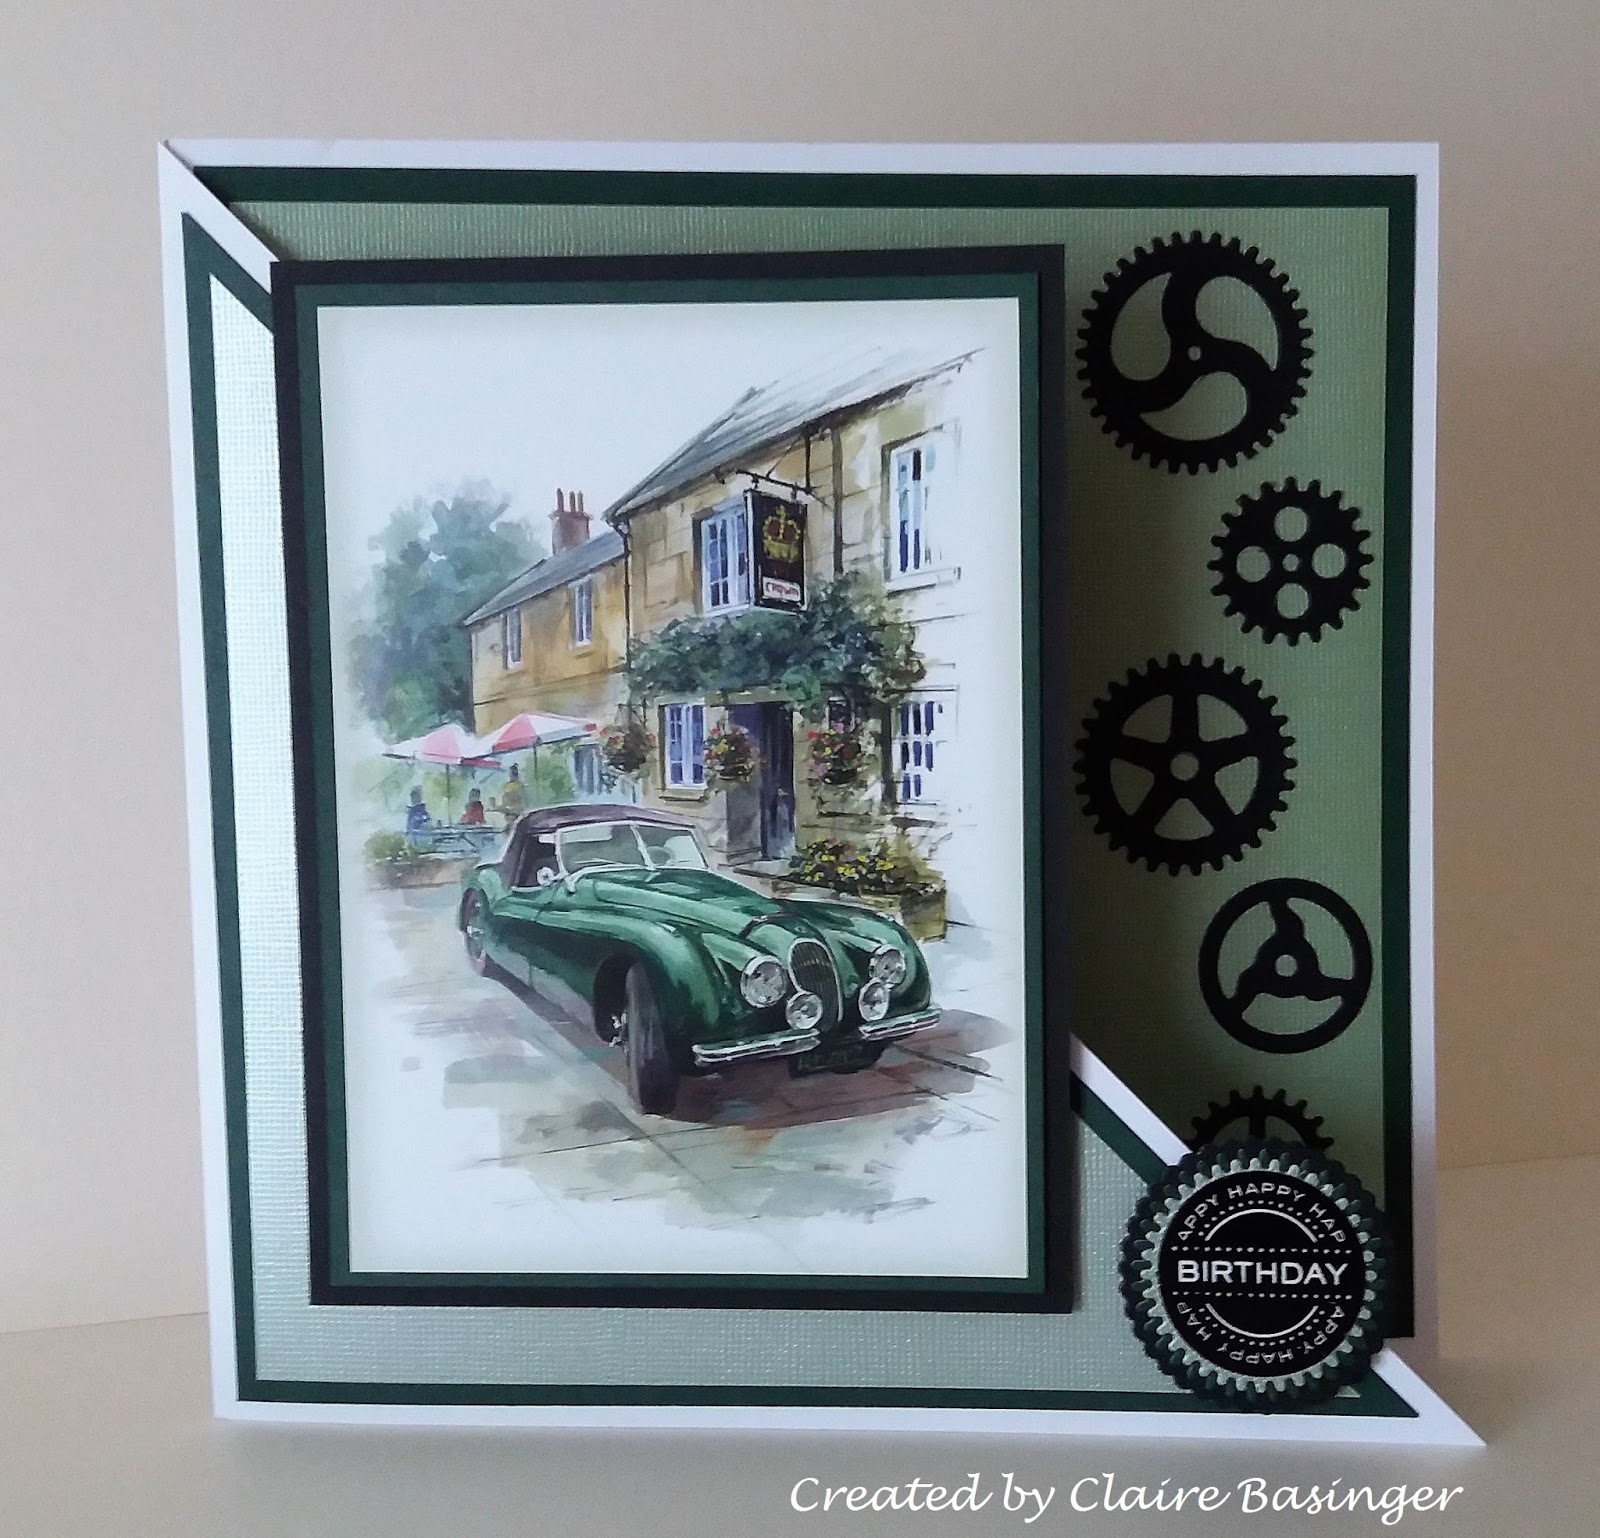
Car birthday card

Hello there,
I've made a couple of variations of this card, one is a plain flat card, the other has a diagonal cut front to it. Men can be difficult to make for and  generally seem to use cars, sport or wine! The plan one was quite quick and easy to make - good job as I was finishing it off the day before the birthday. I had a bit more time for the other so decided to tray the cut front.

It's an 8 x 8 white card blank matted and layered with a dark green mat and a light green, linen effect metallic card - I thought they picked out the colours in the car. The image is from the Hunkydory Little Book of Everything and has been matted onto the green card, then fixed to the card front using foam pads for dimension.
The embellishments are cogs cut from black card using X-Cut dies, and the sentiment is a Craftwork Cards one layered on to a light green then a dark green mat, both cut using the cogs dies.

I'm quite pleased with this design and have made another plain version one already, and hope you like it too. I've a couple more male birthdays this year so can see me making more like this.

If you've time to leave a comment I'd really appreciate it.


Thursday, 23 February 2017

Black and white birthday butterfly

Hello there,
I really like monochrome cards, particularly black and white, but also sometimes with a bit of red added into the mix.

For this card I used an 8 x 8 card blank and added a black mat. The large white mat and smaller panel are both made using some Kanban embossed roses card which I've had in my stash for ages. The small square panel is also layered on to a black mat, placed over some black satin ribbon which I also used for the bow. The pre die cut butterfly is also Kanban from a black, white and red kit I picked up ages ago at a show, it was going cheap as it was all in German! I added some black gems to the body of the butterfly and a swirly gem trail, a Craftwork Cards sentiment and gems to the corners.

I'm entering this into the following challenges:
Crafty Girlz Challenges: Black and white theme
Seize the Birthday: ATG
Tuesday Throwdown: Favourite embellishment - Butterfly


Thanks for stopping by, I hope you like it and if you have time to leave a comment that would be great.

Tuesday, 14 February 2017

Birthday cats

Hello there,

while I was unable to do much crafting and lost my mojo I made really good use of this Little Claire Designs stamp.

I had several birthday cards to make for friends and family and fortunately they all like cats, so  having made a couple of cards it was pretty much variations on a theme. I've not done much colouring so it's pretty basic but something I want to work on.

I used different shape toppers cut using dies, different colours, and sometimes a background paper and other times the Tattered Lace Ditzy Dots embossing folder - which almost looks like paw prints!

I thought I'd post a few examples here, hope you like them.

Thanks for stopping by.


Friday, 30 October 2015

Gate fold birthday card

Hello,
this is a gate fold birthday card made using the Spellbinders Ornamental Iron M-Bossability folder Fleur de Lis design on cream card, matted and layered on to dark green card and pale green satin board. I cut the Spellbinders Fleur de Lis Accent corner dies and medallion die from dark green card, and added a Craftwork Cards happy birthday circle sentiment in the middle of the medallion. I personalised it using the Tonic Pretoria letters to spell Dad.

Thanks for stopping by, please leave a comment if you'd like to.

Tuesday, 11 August 2015

Happy birthday!

Hello,
This is a quick and simple birthday card I made using an embossing folder which came free with a magazine. As it was quite a fancy folder I decided to keep the decoration simple so I just highlighted the embossed detail with gilding wax, matted and layered it on to some gold mirror board and then on to a cream card blank. The sentiment is a Craftwork Cards one and the cream mat is from a Tonic decorative wreath die set.

I'm entering this for the following challenge:

Seize the Birthday: Embossing

Thursday, 23 July 2015

Create a Card birthday cards

Hello there,
I had some birthday cards to make so thought I'd have a go at using the Crafter's Companion Create a Card dies to create a couple of easel cards and a basic card.

The first one was a 90th birthday card made from cream, pink and pale green card. I used embossed cream card for the card blank and cut the Enchanted Create a Card from cream card then used Spun Sugar distress ink to colour through to the embossed areas. I matted the die cut onto pink card then green card and created the easel. I added the name and age, cut using a Tattered Lace from pink card die, to the centre die cut. For the stopper I die cut a second centre die from the Create a Card die and matted and layered it onto a pink mat, then added a pink rose and sentiments cut from the Tattered Lace Cherished Circles dies.


The second card was for a friend's 40th birthday and was created in a similar way using the same Create a Card die. The colour theme for this was cream and dark teal.


The final card was a basic card made with cream and gold card and using the Decadence die with a Craftwork Cards sentiment in the middle.


I hope you like the different cards made from these Create a Card dies.


Tuesday, 21 July 2015

Birthday wishes card

Hello,
I decided to look at my bit boxes and see what I could make with what was there left over from other cards when I'd embossed or die cut card that I'd not used in the end. I found some pale yellow card which was embossed with butterflies, a couple of butterflies punched using a Tonic punch, and the small centre die cut from the Tonic Decorative Wreath Rings die. I matted and layered the embossed card on to gold paper which matched the butterflies and wreath, then on to the same pale yellow card and finally on to a Kraft card blank. I added the wreath to the card with a Craftwork Cards sentiment in the middle then layered up the butterflies.

I'm quite pleased with the end result so I'm going to see what else I can make from my left over bits and bobs. If you'd like to leave a comment and let me know what you think that would be great.

I'm entering this into the following challenges:
4 Crafty Chicks: Clean and simple
Seize the Birthday: Anything goes

Sunday, 3 May 2015

Red and black birthday card

Hello there,

this is a card I made for one of my nieces. I used the Spellbinders M-Bossabilities Imperial folder design A for the white background, matted the two pieces onto red card with a row of black gems to hide the join. This was matted onto white, then black and then on a white 8 x 8 card blank. I used  dies from the Moroccan Accents and Moroccan Motifs die sets cut from red, white and black card stock, layered up with foam pads, put the corners in the top corners and black gems in the bottom corners. I finished it off with a Craftwork Cards sentiment, a red bow and a black dazzler.


Thanks for stopping by, any comments are gratefully received.

Happy birthday corners

Hello there,
today I'm sharing a card that I made for a friend's birthday. I used the Spellbinders Gold Elements One dies  and cut two corners from antique gold card which I matted onto opposite corners of cream card. I then cut tow of each of the flourishes and one of the main motif and put them all along the diagonal. I matted this onto an antique gold mat and then onto an 8 x 8 white pearl card blank. I finished it off with some gold pearls and a Craftwork Cards sentiment in the middle.


I hope you like it, and if you'd like to leave any comments I'd be really grateful.

Saturday, 2 May 2015

Blue and white birthday card

Hello,

this is a birthday card made for a male friend, I didn't want anything too fussy so decided to use fleur de lis as the main design as it has a more masculine feel to it. I used the Spellbinders Ornamental Iron M-Bossability folder embossed on to white card for the background and hid the join with the Fleur De Lis Accents border cut from navy card, then put the Fleur De Lis Corner Accents cut from navy card in the top two corners. The white background was matted and layered on to navy card and then on to a white 8 x 8 card blank. I used the Labels Twenty die cut from navy card and a Spellbinder/JustRite stamp for the sentiment, stamped in Memento Marine Blue. It was finished off with navy Craftwork Cards Card Candi in the bottom corners and above the border.


I think it has a masculine feel about it and hope you think so too. Thanks for stopping by, as always any comments gratefully received.

Snowy rabbit

Hello there,
this is the first card I've made using acetate, it's the snowfall acetate from Hunkydory which I've seen demonstrated a few times, plus items from the Snowy Animals paper kit.

I started with an 8 x 8 card and then cut most of the front off just leaving a 1.5 inch strip on the left side. I took some snowflake backing card and layered it onto silver mirri to cover the inside of the card, Then I cut 2 panels 1.5 x 8 inches of mirri and layered panels of the snowflake card on to them. I cut an 8 x 8 piece of snowflake acetate and glued the 2 panels at each end then glued the left end to the flap on the front of the card, this covered the glue on the acetate, and then I glued a panel of white card on the inside of the other panel to cover the glue.

Inside the card a glued a large rabbit topper and a sentiment to the middle so that they showed through the acetate. I finished the front off with a snowflake punched from silver mirri and three silver Card Candis.


I think this card would work as a winter birthday card or a non-religious Christmas card. If you'd like to leave a comment I'd be glad to receive it.


Friday, 1 May 2015

Another Whirl About card

Hello there,

this is another card made from the Spellbinders Whirl About Cut, Fold and Tuck die for a friend. I cut the dies from two-tone, double-sided lilac card which I matted onto lilac mirri. I used a white 8 x 8 card blank and matted and layered it with lilac patterned paper and lilac mirri then placed the die cuts onto the card. I used Craftwork Cards Card Candi in the centres of the smaller die cuts and a sentiment in the middle of the large one. I finished it off with a lilac and silver ribbon bow in the final upper corner.


Thanks for stopping by, any comments gratefully received.

Tuesday, 28 April 2015

Butterfly tied Z-fold card

Hello,
this is the last of the three cards I made for one of the units in the Certificate in Paper Craft I'm studying. It was inspired by a feature in Quick Cards Made Easy magazine - and has even been featured in the letters page of issue 139!

I used a white 8 x 8 card blank scored down the middle and folded back. I matted the folded back front and the inside with silver mirri then cut some some lilac card with a subtle lilac floral pattern on it from a Kanban kit to matt on to the silver. The focal point on the front is an Imagination Crafts butterfly stamped in purple onto white, matted onto Hobbycraft periwinkle pearlescent card, then onto silver and finally onto white. Inside I stamped the same image in pale lilac and added a Tonic Birthday Wishes die cut sentiment on it, plus a Craftwork Cards sentiment in the bottom corner. I even found some lilac organza ribbon with butterflies embossed on it to tie the card to finish it off.


I'd not made anything like this before so was really pleased with the result, I hope you like it too.

Thanks for stopping by, as always any comments you might like to leave are gratefully received,


Sunday, 26 April 2015

60th birthday card

Hello,

I'm currently studying for the Certificate in Paper Craft and have just passed Unit 3 - with Credit! Soooo pleased :-) I am going to post the three cards I made for this Unit and this is the first one.

It's a 60th birthday card made for a friend I've known since junior school, but she's a year younger than me. I found the ribbon and used that as a starting point - plus she supports Liverpool so I wanted to include red in the card. I matted some rose embossed card on to gold paper and then matted this on to an 8 x 8 white card blank. I cut the Tonic Happy Birthday Pansy Topper die set from red card and inserted a topper into it, then created flowers from the Bellus Buttercup in red and the Delicate Daisy flower in gold with gold Craftwork Cards Card Candi in the middle of the flowers. I cut gold Fanciful Flourishes to go with the flowers and put gold Card Candi in the corners then added the bow to finish it off.


As there was depth to the card and it had to go through the post I also made a box for the card. I used the same rose embossed card matted onto gold paper, a red and gold flower and gold Card Candi. The sentiment is also Tonic from the Topper die set with a Tonic butterfly to finish it off. I'm pleased to say that my friend was delighted with the card.


Thanks for stopping by, any comments gratefully received.

Saturday, 11 April 2015

Let's have a whirl!

Been a few days since I had time to craft and blog - catching up with boring chores and also away for Easter - hope you had a good one!

I decided to make a card using my Spellbinders Whirlabout die which I've only used a couple of times so far and to follow a challenge sketch to get me back in the crafty zone again. I used a double sided lilac card, layered it onto lilac mirror card and put some Craftwork Cards Card Candi in the middle. I matted and layered purple dotty embossed card onto lilac mirror card, then on to a white 8 x 6 card blank. I cut 3 strips of the lilac card, used a Tattered Lace die for the sentiment which I stuck onto a matt created from a Spellbinders Layering die set.


I'm entering this for the following challenges:

Die Cuttin Diva's Sketch Challenge
4 Crafty Chicks: Die cuts
Pile it on: Die cuts and/or punches
Fan-Tastic Tuesday: use a die or punch

Thanks for stopping by, any comments gratefully received.

Thursday, 26 March 2015

If music be the food of love ...

I needed to make an 18th birthday card for the daughter of close friends and as she is very into music - and was getting a guitar for her birthday - I decided to make that the theme.

I got some guitar printed paper which I cut into a square and matted and layered it onto silver then red card cut using the Tonic Layering dies. I stamped some treble clefs randomly onto white card then matted it onto red card and then silver mirror board. I wrapped black musical printed ribbon around two of the corners and fixed it to an 8 x 8 black card blank. I cut a circle of red and a circle of silver using the Spellbinders scalloped circles dies and put a silver sentiment into the middle of the topper which I then fixed to the middle of the card using foam pads.

She was delighted with the card and I can now safely put it on my blog! I hope you like this one and those below - why not leave me a comment and let me know.


I'm entering this card into the Die Cuttin Divas Challenge: Music in our schools.

As it was 12 x 12 I managed to get 4 cards out of it altogether, a similar colour scheme and Spellbinders die - always useful to have a few in hand! The stamps used were free with an issue of Creative stamping a couple of years ago, and the sentiments all by Craftwork Cards.


Monday, 23 March 2015

Birthday cards for friends

Hi there, March is a busy month for me from a card making point of view as I have several birthdays, plus there's Mother's Day and often Easter too. Here are a couple of birthday cards I made for friends this month.

For this one I used Tattered Lace dies and cut the Tattered Lace Floral panel 3 times cut in pearlescent cream card and fixed it to orange card, then matted and layered cream and orange card. I die cut a poppy in cream and orange and also two flowers from a floral die set cut in cream and orange,  not sure which set though as it was a gift from a friend. I secured the petal layers with a copper brad, cut best wishes in orange, and layered it all on to a 17x18 cm cream card blank. I got the idea for this from the issue 8 of the Tattered Lace magazine as the die came free with the magazine. 


The other card was made using the Spellbinders Cut, fold and tuck Whirlabout die and I cut the small and medium dies from pale lilac double sided card which I layered onto purple mirror board. In the centre of the two small ones I attached purple Craftwork Cards Candi and in the middle of the large one a Craftwork Cards sentiment. I also cut a bow using the Tonic Lacy Bows die set from the lilac card. I used an A5 white pearlescent card blank and layered purple pearlescent card which had been embossed using the Tattered Lace Ditzy dots embossing folder onto purple mirror board. The die cuts and bow were then fixed to the card front.  


I hope you like them, thanks for stopping by and if you've any comments as usual they're always welcome.